


Writing integration tests used to be a real time-devouring monster, especially if your application connects to a variety of external systems and you have to emulate each of them in your testing environment.
Luckily, Testcontainers came to be. The solution helps to minimize the time spent on setting up a testing environment without sacrificing the reliability of test results.
In this article, I’ll show you how to integrate Testcontainers into your Spring Boot projects.
By the way, if you deploy Spring Boot services to the cloud, check out Alpaquita Containers tailor-made for Spring Boot: they can reduce the memory footprint of your containers by up to 30 %!
Table of Contents
What is Testcontainers?
Testcontainers is an open-source solution that provides throwaway Docker instances of various external systems for integration testing.Testcontainers provide an extensive variety of modules: relational, noSQL, and vector databases, message brokers, clouds, etc. — basically, anything that can be put and run in a Docker container. Several languages are supported, including Java. You can use Testcontainers with applications based on popular frameworks such as Spring Boot.
Why you should integrate Testcontainers into your development practice
Testcontainers offer several benefits over traditional in-memory or mock services:
- Testcontainers minimize the time spent on setting up a testing environment because developers don’t have to write mocks to emulate all external services their application connects to.
- The modules offered by Testcontainers are the instances of real systems, which eliminates the risks of unexpected application behavior in the production environment even though the tests passed.
- Testcontainers take care of the test instances, pulling and deleting them automatically, which also contributes to accelerated CI/CD.
Testcontainers vs mock services
Like Testcontainers, mock services emulate the external services your application communicates with, but these two technologies are not the same. Both have advantages and disadvantages as compared to each other, as well as specific test scenarios.
Mock services imitate the external systems by sending responses corresponding to user expectations. Compared to Testcontainers, there are few ready solutions for testing, so developers usually have to write their mocks, which is a complex task. In addition, mock services don’t always imitate the external system perfectly, whereas Testcontainers represent the real external systems used in production.
However, once written, mock services start up immediately, so tests may run much faster than those based on Testcontainers because with Testcontainers, you have to pull a Docker image with an instance of the required external service, which, depending on the instance size and Internet speed, may take a while. Luckily though, you don’t have to restart the instance every time you recompile your app. Spring Boot, for instance, offers DevTools to introduce changes to the code on the fly without restarting the JVM, and the @RestartScope annotation for Testcontainers to keep the instance running as long as you need.
But there’s another tangible benefit to mock services. They help to test all possible scenarios because they can imitate any working state including failures, which may be essential for some applications. Testcontainers also offer modules for network failures testing such as Toxiproxy Module, Microcks and WireMock for mocking APIs, but in general, they don’t offer such refined control over testing environments as tailored mocks.
To conclude, Testcontainers offer a convenient way to perform integration testing without writing an emulation of an external service. They accelerate development because developers don’t waste time setting up a testing environment. On the contrary, mock services may be difficult to write, but they offer finer control over a wide range of testing scenarios.
So it is possible to use Testcontainers for most tests and write mock services only when you need to test a very specific scenario.
Using Testcontainers with Spring Boot
You can use Testcontainers with any Java application, but I’ll show you how to integrate the solution into a Spring Boot project. Spring Boot offers first-class support for Testcontainrs including the default dependency at Spring Initializr.
Prerequisites
- Java 21, the latest Java LTS release (I will use Liberica JDK recommended by Spring)
- Docker
- You favorite IDE
Create a Spring Boot project
First, let’s create a brand-new Spring Boot 3 project. Go to start.spring.io and select maven, Java 21, the latest stable Spring Boot version, and the following dependencies: Spring Web, Testcontainers, PostgreSQL Driver, Spring Data JPA, and Lombok.
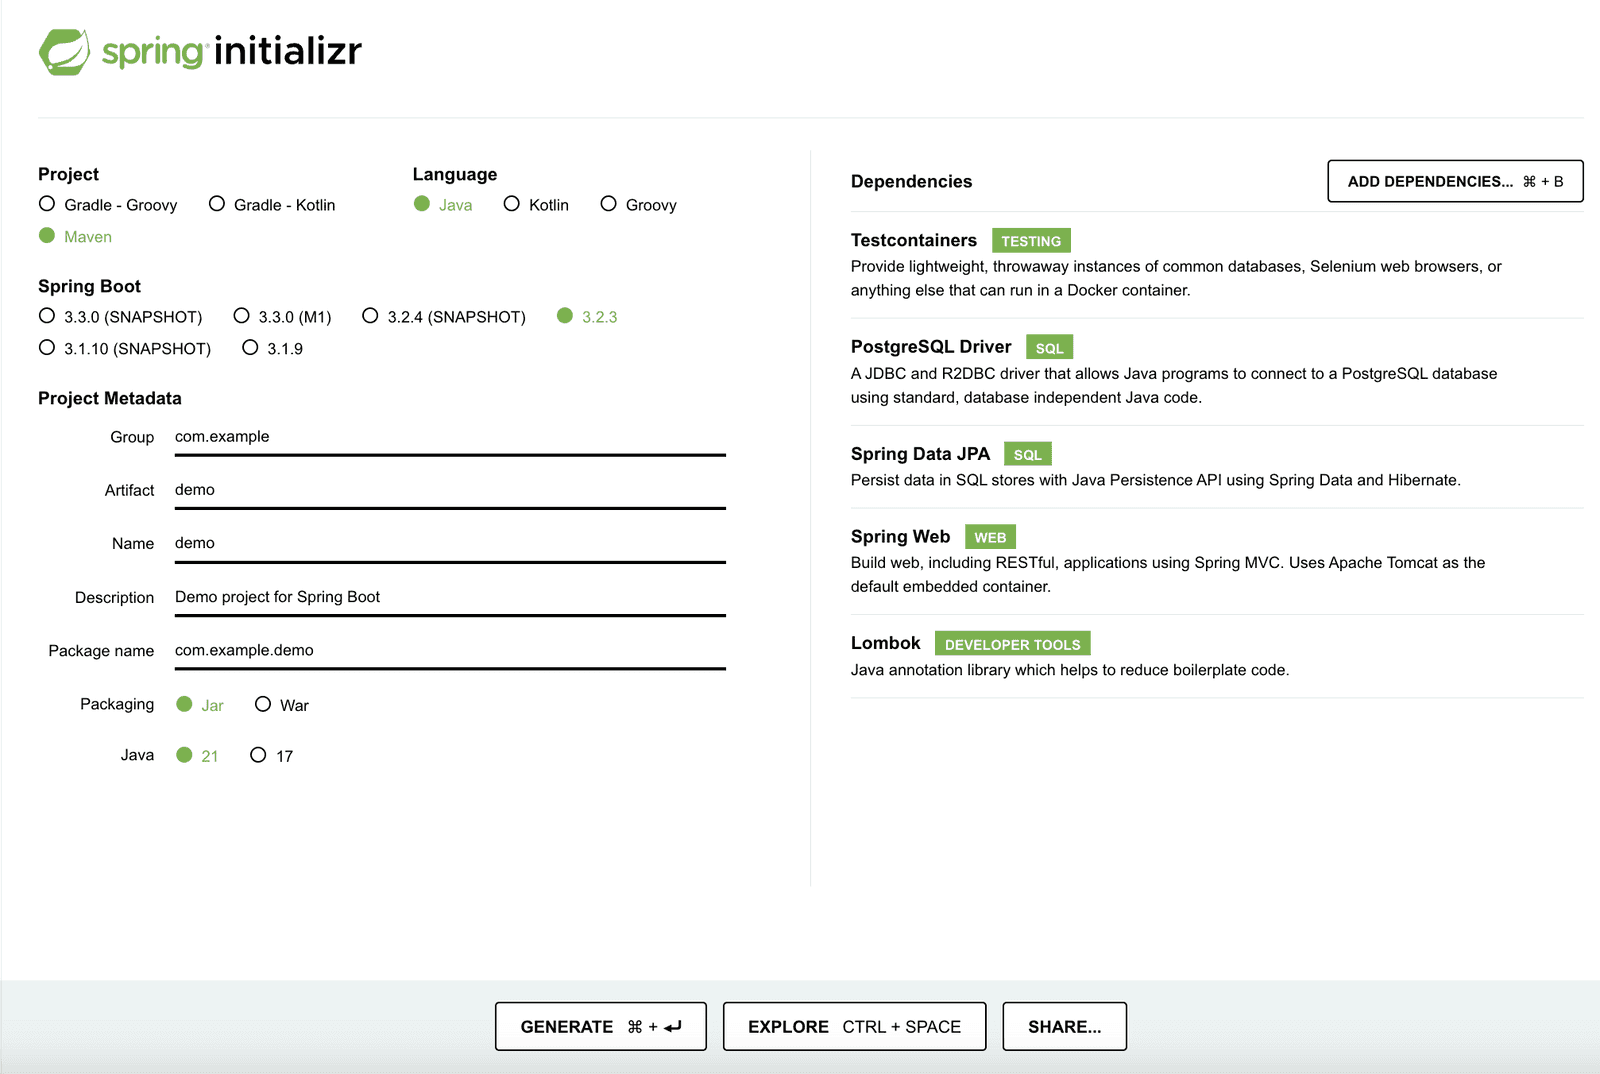
Creating a demo project
Generate the project and open it in your IDE.
Let’s create an entity class first. I’m using Lombok to reduce the boilerplate code.
@Entity
@Table (name = "books")
@AllArgsConstructor
@NoArgsConstructor
@Getter
@Setter
public class Book {

    @Id
    @Column(name = "id", nullable = false)
    private Integer id;

    @Column(name = "title")
    private String title;

    @Column(name = "author")
    private String author;

    @Column(name = "publication_year")
    private int publicationYear;

}
Then, create a repository interface.
public interface BookRepository extends JpaRepository<Book, Integer> { }Now, create a Controller class with several methods.
@RestController
public class BookController {
    private final BookRepository repository;
    public BookController(BookRepository repository) {
        this.repository = repository;
    }
    @GetMapping("/books")
    List<Book> findAll(){
        return repository.findAll();
    }

    @GetMapping("/books/{id}")
    public Book findById(@PathVariable int id) {
        Optional<Book> tryBook = repository.findById(id);
        Book book;
        if(tryBook.isPresent()){
            book = tryBook.get();
        }
        else{
            throw new RuntimeException("Didn't find book id: " + id);
        }
        return book;
    }


    @PostMapping("/books")
    public Book addBook(@RequestBody Book book) {
        return repository.save(book);
    }
}
Create a schema.sql file in resources with the following content:
create table if not exists books (
    id serial primary key,
    title varchar(255) not null,
    author varchar(255) not null,
    publication_year int not null
);
Finally, enable schema initialization in the application.properties file:
spring.sql.init.mode=alwaysWrite integration tests using Testcontainers
Alright, it’s time to write some integration tests for our demo Spring Boot app.
Generate a Test class for our BookController. Right now, it’s absolutely empty:
class BookControllerTest { }First of all, annotate the class with @SpringBootTest(webEnvironment = SpringBootTest.WebEnvironment.RANDOM_PORT). It helps to start the application on a random port. You will also need @Testcontainers indicating that this class uses Testcontainers:
@SpringBootTest(webEnvironment = SpringBootTest.WebEnvironment.RANDOM_PORT)
@Testcontainers
class BookControllerTest { }
Next, we need to tell Testcontainers to pull a Docker container image with a ready PostgreSQL instance that we’ll use for our tests.
Note that there are two ways to use such containers: you can completely isolate the tests from each other by wiring up a new database instance before each test. But it may increase the time for running all tests significantly. So we will use one container for the whole test class, and I’ll show you how to manage it so that the test results don’t interfere with each other.
Let’s configure the PostgreSQLContainer. Add @Container and @ServiceConnection annotations and define the name of the image. I’m using the latest PostgreSQL version, but it is recommended to set the one you use in production.
    @Container
    @ServiceConnection
    static PostgreSQLContainer<?> postgresContainer =
            new PostgreSQLContainer<>(DockerImageName.parse("postgres:latest"));
Starting with Spring Boot 3.1, the process of setting up a container is easier because there’s no need to define the datasource properties (url, username, and password) thanks to the @ServiceConnection annotation that tells Spring Boot to configure the properties automatically.
Next, define the methods to start the container before running any tests and stop it after all tests will have executed.
    @BeforeAll
    static void beforeAll() {
        postgresContainer.start();
    }

    @AfterAll
    static void afterAll() {
        postgresContainer.stop();
    }
Add the BookRepository instance, a RestTemplate instance to perform HTTP requests, and the port that Spring Boot chose for running the application:
    @Autowired
    BookRepository repository;

    @LocalServerPort
    private Integer port;

    @Autowired
    TestRestTemplate restTemplate;
As I mentioned, we will use one container for all tests meaning that we have to populate the database with some data before each test and perform some cleaning up after each test. We also need to register a base URI. So the setUp() and clear() methods will look as follows:
    @BeforeEach
    void setUp() {

        restTemplate.setUriTemplateHandler(new DefaultUriBuilderFactory("http://localhost:" + port));

        List<Book> books = List.of(
                new Book(1, "The Turn of the Screw", "Henry James", 1898),
                new Book(2, "American Gods", "Neil Gaiman", 2001),
                new Book(3, "Dandelion Wine", "Ray Bradbury", 1957)
        );
        repository.saveAll(books);
    }

    @AfterEach
    void clear() {
        repository.deleteAll();
    }
We’re all set! Let’s create some tests.
I’ll add two tests for finding all books and finding one book by id:
    @Test
    void shouldReturnBookById() {
         String title = "The Turn of the Screw";
        ResponseEntity<Book> response = restTemplate.getForEntity("/books/1", Book.class);
        assertNotNull(response.getBody());
        assertEquals(HttpStatus.OK, response.getStatusCode());
        assertEquals(title, response.getBody().getTitle());

    }

    @Test
    void shouldFindAllBooks() {

        Book[] books = restTemplate.getForObject("/books", Book[].class);
        assertEquals(3, books.length);

    }
Note that with Testontainers, it is better to get as much information about the request as possible. Take a shouldReturnBookById test. If we only assert that the response body is not null, it doesn’t guarantee that the body contains the object we asked for. I deliberately broke my code so that the program couldn’t find a book by id. The test passed, but the logs contained the exception we threw in the method in case the object was null.
So it would be better to check what exactly the response body contains, as well as the HTTP status of the response.
Another test will verify that we can successfully create a book:
    @Test
    void shouldCreateBook() {

        Book book = new Book(4, "The Catcher in the Rye", "J. D. Salinger", 1951);
        ResponseEntity<Book> response = restTemplate.exchange("/books", HttpMethod.POST, new HttpEntity<Book>(book), Book.class);

        int yearExpected = 1951;
        assertEquals(HttpStatus.OK, response.getStatusCode());
        assertNotNull(response.getBody());
        assertEquals(yearExpected, response.getBody().getPublicationYear());

    }
And here’s the complete code for our BookControllerTest class:
import org.junit.jupiter.api.*;
import org.springframework.beans.factory.annotation.Autowired;
import org.springframework.boot.test.context.SpringBootTest;
import org.springframework.boot.test.web.client.TestRestTemplate;
import org.springframework.boot.test.web.server.LocalServerPort;
import org.springframework.boot.testcontainers.service.connection.ServiceConnection;
import org.springframework.http.HttpEntity;
import org.springframework.http.HttpMethod;
import org.springframework.http.HttpStatus;
import org.springframework.http.ResponseEntity;
import org.springframework.web.util.DefaultUriBuilderFactory;
import org.testcontainers.containers.PostgreSQLContainer;
import org.testcontainers.junit.jupiter.Container;
import org.testcontainers.junit.jupiter.Testcontainers;
import org.testcontainers.utility.DockerImageName;

import java.util.List;

import static org.junit.jupiter.api.Assertions.*;

@SpringBootTest(webEnvironment = SpringBootTest.WebEnvironment.RANDOM_PORT)
@Testcontainers
class BookControllerTest {

    @Autowired
    BookRepository repository;

    @LocalServerPort
    private Integer port;

    @Autowired
    TestRestTemplate restTemplate;

    @Container
    @ServiceConnection
    static PostgreSQLContainer<?> postgresContainer =
            new PostgreSQLContainer<>(DockerImageName.parse("postgres:latest"));

    @BeforeAll
    static void beforeAll() {
        postgresContainer.start();
    }

    @AfterAll
    static void afterAll() {
        postgresContainer.stop();
    }

    @BeforeEach
    void setUp() {

        restTemplate.setUriTemplateHandler(new DefaultUriBuilderFactory("http://localhost:" + port));

        List<Book> books = List.of(
                new Book(1, "The Turn of the Screw", "Henry James", 1898),
                new Book(2, "American Gods", "Neil Gaiman", 2001),
                new Book(3, "Dandelion Wine", "Ray Bradbury", 1957)
        );
        repository.saveAll(books);
    }

    @AfterEach
    void clear() {
        repository.deleteAll();
    }

    @Test
    void shouldReturnBookById() {
        String title = "The Turn of the Screw";
        ResponseEntity<Book> response = restTemplate.getForEntity("/books/1", Book.class);
        assertNotNull(response.getBody());
        assertEquals(HttpStatus.OK, response.getStatusCode());
        assertEquals(title, response.getBody().getTitle());
    }

    @Test
    void shouldFindAllBooks() {

        Book[] books = restTemplate.getForObject("/books", Book[].class);
        assertEquals(3, books.length);

    }

    @Test
    void shouldCreateBook() {

        Book book = new Book(4, "The Catcher in the Rye", "J. D. Salinger", 1951);
        ResponseEntity<Book> response = restTemplate.exchange("/books", HttpMethod.POST, new HttpEntity<Book>(book), Book.class);

        int yearExpected = 1951;
        assertEquals(HttpStatus.OK, response.getStatusCode());
        assertNotNull(response.getBody());
        assertEquals(yearExpected, response.getBody().getPublicationYear());

    }

}
Time for the most exciting part — let’s run it!
Run the BookControllerTestClass and in a couple of seconds, you should see that all tests have passed.
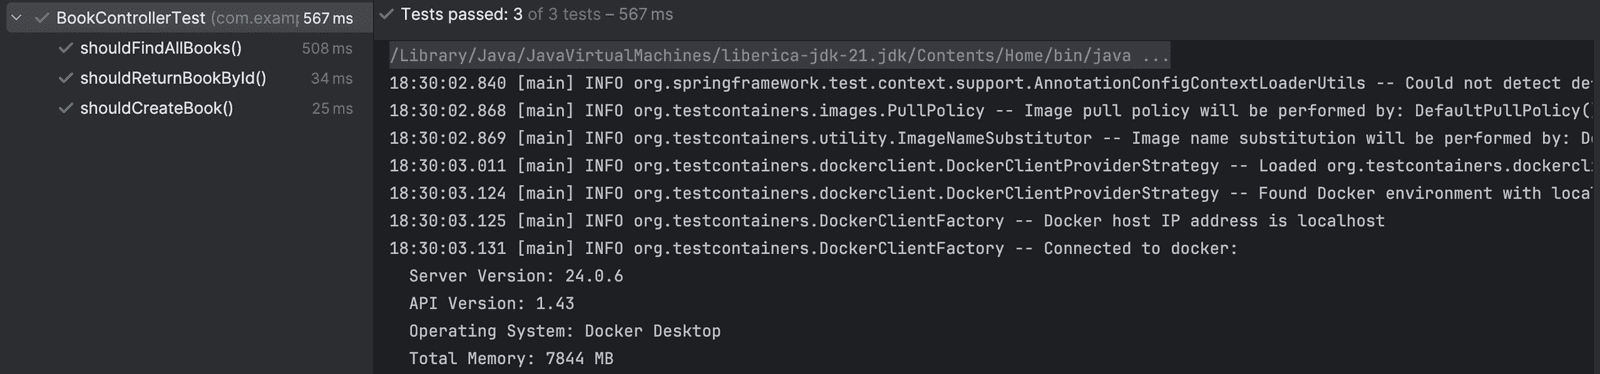
Running the tests
Conclusion
As you can see, writing integration tests with Testcontainers is extremely convenient. And Spring Boot offers integrated support of the feature, so it is definitely worth adding them to your workflow.
By the way, containerizing Spring Boot apps is more convenient than ever! Try out Alpaquita Containers tailored to Spring Boot or Alpaquita Buidpack for automated containerization, and may your containers always be small and performant!
Want to receive more tips and guides on Spring Boot 3 development? Subscribe to our newsletter and don't miss new articles!


